From Blocks to Bounty: Starting Seeds in a Soil Blocking Station
Have you ever marveled at how a tiny seed can survive even the darkest and dreariest winter, patiently waiting for the right conditions to sprout and flourish. Helping this miraculous transformation...
Have you ever marveled at how a tiny seed can survive even the darkest and dreariest winter, patiently waiting for the right conditions to sprout and flourish? Helping this miraculous transformation occur doesn't require fancy equipment, a green thumb, or even any outdoor space—just a little knowledge and motivation. With spring arriving, now is the perfect time to set up a simple seed-starting system using a sustainable practice called “soil blocking.” Whether you’re growing seedlings for a large outdoor garden or a tiny indoor windowsill or to give to friends, soil blocking produces healthier plants and reduces plastic pot use.
Environmental Impact of the Modern Home Gardening Industry
The environmental footprint of conventional home gardening is often overlooked, yet the numbers are grim. Studies show that up to half a billion plastic plant pots end up in landfills or incineration facilities each year, with only about 10% ever being recycled. These plastic containers consume petroleum and methane refined from diminishing fossil supplies and end up as air pollution and landfill waste—persisting as a problem for hundreds of years. By adopting soil blocking, you join a movement to reduce this unnecessary waste while growing stronger, more resilient plants.
Why Start Seeds Indoors?
“Seed starting” means exposing seeds to water and warmth so they germinate indoors to give them a head start before the outdoor growing season begins. Instead of waiting for warm weather to plant directly in the garden or buying pre-grown plants from nurseries, starting seeds yourself offers numerous advantages:
Lower cost: A single $3-4 packet of seeds can yield dozens of plants that would cost $3-5 each at a garden center.
Greater variety: Seed catalogs offer thousands of varieties that are not available locally as transplants.
Environmental benefits: Grow your own food and flowers without plastic packaging, transportation emissions, or chemical treatments common in commercial growing.
Personal satisfaction: Enjoy the feeling of nurturing a plant from seed to harvest.
Full control: You decide what goes into your plants from day one.
Even if you lack outdoor garden space, seed starting is accessible to almost everyone. Apartment dwellers can grow herbs for cooking, microgreens for nutritious salads, or flowers for beauty—all in a sunny window or under simple grow lights. A few pots of homegrown basil, cilantro, or cherry tomatoes can thrive on a balcony or windowsill.
What is Soil Blocking?
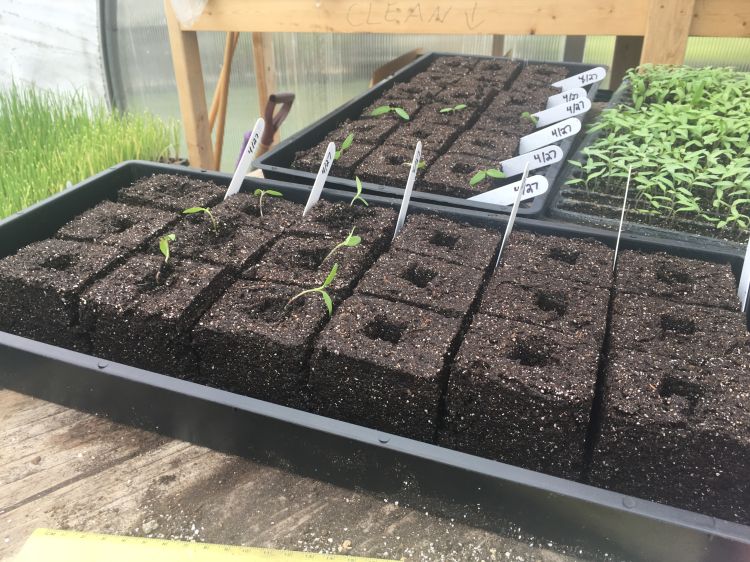
Soil blocking is a seed-starting technique that uses compressed cubes of soil mixture instead of individual pots or plastic sprouting cell trays. Think of it as creating “pot-less pots” where the growing medium itself forms the container. You can put soil cubes on a plastic or metal tray, which you can use year after year, and keep them moist from the bottom by adding water to the tray the cubes are resting on.
The process involves:
Preparing a special soil mixture that holds together when compressed while being porous enough for small roots to grow through it
Using a tool called a "soil blocker" to create uniform soil cubes
Planting seeds directly into these standalone soil blocks
Growing seedlings until they're ready to transplant outdoors or into reusable large pots
Unlike traditional methods using disposable plastic pots or plastic cell trays, soil blocking reduces plastic waste and creates healthier root systems. When a growing root reaches the edge of a soil block, it naturally “air prunes” (stops growing outward) rather than circling around as it would in a pot. This can create stronger plants that establish more quickly when transplanted. Better root development (along with “hardening off”) helps plants survive the “shock” of being moved to their final growing location.
Quick-Start: Perfect for Apartments and Small Spaces
You don’t need an outdoor garden to benefit from starting seedlings in soil blocks. This practice works well in apartments and is ideal for growing herbs, flowers, microgreens, or a few salad greens.
Essential Equipment
Soil blocker tool: A 2-inch blocker works well for most vegetables, herbs, and flowers ($30-40)
Plastic or metal trays: Standard nursery trays, repurposed containers like takeout trays, or even metal cookie pans
Basic grow light: A simple LED shop light with 5,000+ lumens ($20-30) or a very sunny south-facing window
Small table or shelf: Any flat surface in a warm location—a kitchen counter can work
Mixing container: A large tub or bucket for preparing soil mix
Basic Soil Mix Recipe:
This soil mixture holds together, provides nutrients in a form that is safe for baby plants and is porous enough for tiny roots to penetrate.
3 parts seed starting mix
1 part compost
1 part perlite or vermiculite
Water to achieve mud-like consistency
Best Plants for Beginners with Limited Space:
Culinary herbs: Basil, cilantro, parsley, and chives grow easily
Leafy greens: Lettuce, spinach, and arugula for fresh salads
Microgreens: Ready in just 7-14 days, offering concentrated nutrition
Flowers: Marigolds, zinnias, or nasturtiums bring color to small spaces (and some are edible)
Cherry tomatoes: Compact varieties can thrive in sunny windows or balconies
Step-by-Step Process:
Mix soil ingredients thoroughly in a large container.
Add lukewarm water gradually until the mixture resembles wet concrete or cookie dough.
Press the soil blocker firmly into the mixture, twist slightly, and lift.
Eject blocks onto a tray by pressing the plunger while lifting the blocker.
Push one seed into each depression on top of the blocks.
Place under lights or in a sunny window, keeping lights 2-3 inches above seedlings.
Bottom water by adding water to a tray beneath your blocks.
Pro Tip: The mix must be very wet (almost mud-like) for blocks to hold together properly. If you’re growing just a few plants, you can even make soil blocks by hand using small cookie cutters or an ice cube tray as a mold.
Intermediate Level: Expanding Your Indoor Garden
As your interest grows, you can expand your seed-starting operation while still keeping it manageable in an apartment or small home. This level works well for those wanting to grow more food year-round indoors or start plants for a small outdoor garden, balcony, or community garden plot.
Improved Setup:
Multi-tier shelving unit: Wire rack shelving with multiple levels to maximize vertical space
Better lighting system: Full-spectrum LED grow lights with adjustable height
Temperature control: Seedling heat mats with thermostats to improve germination
Mini soil blocker: 3/4-inch blocker for starting small seeds (herbs and flowers)
Timer: Automatic timer for lights (16 hours on, 8 hours off)
Enhanced Soil Mix:
3 parts coconut coir (more sustainable than peat moss)
2 parts finished compost (screened)
1 part perlite
1/2 part worm castings (from a worm composting bin)
1 tablespoon balanced organic fertilizer per gallon of mix
Improved Process:
Germinate tiny seeds in 3/4-inch mini blocks; this allows you to start more seeds with a given amount of seed-starting soil mix.
Once seedlings emerge, “pot up” by placing mini blocks into prepared depressions in the larger 2-inch blocks, giving roots more room to grow.
Implement bottom watering with capillary mats for consistent moisture.
Create a simple spreadsheet to track varieties, planting dates, and germination rates.
“Harden off” seedlings gradually (i.e., place them in locations that experience more variation in sun, wind, and temperatures, such as in a sheltered spot on a porch for a few hours every day) before transplanting outdoors.
Pro Tip: Coconut coir provides a similar structure to peat moss but is more environmentally sustainable and has a neutral pH (no need to add lime).
Advanced Level: For Serious Home Growers and Small Market Gardeners
This level is designed for serious home gardeners with outdoor growing space or those supplying a small community-supported agriculture (CSA) operation or farmers market. While requiring more space, the environmental benefits scale up significantly at this level–growing more of your own food reduces dependence on the industrial food system with its associated transportation emissions and packaging waste.
Professional Setup:
Dedicated seed starting area: Converted basement space or spare room
Custom-built shelving: Wooden or metal shelving system with precise spacing
Advanced lighting: High-output LED grow lights with programmable spectrum
Environmental controls: Thermostat-controlled heating, humidifier, and circulation fans
Multi-size blocker system: Complete set of blockers (3/4", 2", and 4")
Custom trays: Reusable trays built to exact specifications
Eliot Coleman’s Professional Soil Block Mix:
As formulated in his book “The New Organic Grower”:
30 parts brown peat moss (standard peat moss)
20 parts coarse sand or perlite
20 parts well-decomposed compost
10 parts garden soil
3/4 part base fertilizer (equal parts blood meal, colloidal phosphate, and greensand)
1/8 part lime (agricultural lime if available)
Advanced Process:
Create a dedicated mixing station with large-capacity mixing containers.
Establish a precise watering system with automatic moisture monitoring.
Implement crop rotation planning software to maximize efficiency.
Track all variables affecting seedling health (temperature, light, humidity).
Schedule succession sowings for continuous harvests.
Experiment with different soil block sizes for different crops.
Pro Tip: When “potting up” from mini blocks to larger blocks, wait until you see roots reaching the edges of the mini blocks before transplanting.
Expert Level: Commercial Production with Minimal Environmental Impact
This level describes a commercial system that prioritizes sustainability. While beyond what most individuals would implement, understanding these systems helps us appreciate how professional growers can minimize environmental impact. Climate-conscious market farms and commercial nurseries use these approaches focused on ecological growing methods.
Commercial-Grade Setup:
Walk-in growing room: Insulated, climate-controlled growing space powered by renewable energy
Rolling bench system: Mobile growing surfaces to maximize space
Automated environmental control: Integrated system managing light, temperature, humidity
Commercial soil blockers: 50-cell or 72-cell commercial blockers
Specialized mixing equipment: Soil mixer/tumbler for consistent results
Data tracking system: Software to analyze all variables and outcomes
Custom Soil Block Mix Based on Lifecycle Analysis:
Base mix formulated from locally sourced sustainable materials (e.g., leaf mold instead of peat moss or coconut coir)
Biochar (i.e., wood heated in a low-oxygen environment) incorporated for improved soil structure and microbial habitat
Mycorrhizal inoculants to improve nutrient uptake
Custom mineral amendments based on soil tests
Focus on renewable materials with minimal carbon footprint
Expert Process:
Develop crop-specific soil blocking protocols (different blocks/mixes for different plant families).
Implement precision germination temperature control (varying by crop type).
Utilize spectral tuning of light for specific growth phases.
Create microclimate zones within the growing space.
Establish closed-loop control systems (i.e. measure outputs and adjust inputs based on measurements) for water and nutrients.
Develop detailed standard operating procedures for all processes.
Pro Tip: Research indicates that adjusting the light spectrum as plants develop (more blue light for vegetative growth, more red for flowering/fruiting) optimizes plant development.
Scientific Benefits of Soil Blocking
Research and practical application indicate that soil blocking may have some advantages over conventional methods:
Improved root structure: The air pruning effect creates more fibrous root systems inside the soil block rather than circling roots common in plastic containers. When transplanted, root-dense soil blocks reduce trauma to seedlings, resulting in higher survival rates and healthier plants.
Faster establishment after transplanting: Seedlings grown in soil blocks start out healthier and grow faster compared to root-bound seedlings.
Space efficiency: A standard-size seed starting tray can hold around 200 soil blocks, allowing you to grow a significant amount in a very small area—perfect for apartments.
Environmental sustainability: Soil blocks reduce the waste and expense of plastic pots and cell trays that often end up being trucked to landfills or incinerators or disintegrating into microplastic pollution.
Common Troubleshooting
Blocks falling apart: Mix is too dry; add more water to achieve mud-like consistency
Blocks too wet: Add more dry mix to achieve proper balance
Mold and mildew growth: Improve air circulation, water from bottom only, dust with cinnamon
“Leggy” (i.e., long-stemmed and floppy) seedlings: Move to a sunnier window, move the grow lights closer, and ensure 16 hours of light daily
Poor germination: Check soil temperature, ensure consistent moisture, check seed packing date
Resources for All Growing Levels
Books
Apartment Gardening: Plants, Projects, and Recipes for Growing Food in Your Urban Home
The Herb Society of America's Essential Guide to Growing and Cooking with Herbs
The New Organic Grower: A Master's Manual of Tools and Techniques for the Home and Market Gardener
Online Resources
Gardenary - Start a garden or a garden business
Square Foot Gardening - Grow your own organic produce
University Extension Services - Ask a question of an extension expert
Conclusion: Start Small, Grow Big Impact
Whether growing herbs on a windowsill or supplying a farmers market, creating your own efficient seed starting station with soil blocking is an investment that pays environmental and personal dividends. Start with just a few plants at whatever level matches your space and resources, then gradually expand as your confidence grows.
Even the smallest effort to grow some of your food or flowers connects you to natural cycles, reduces dependence on industrial systems, and builds resilience. For apartment dwellers, a single pot of homegrown herbs represents a small but meaningful step toward sustainability.
Timing is crucial if you’re growing outdoors—starting seeds seven weeks before your last frost date gives most plants the perfect head start for a productive growing season. But beyond timing, the most important step is simply to begin.
Happy growing!